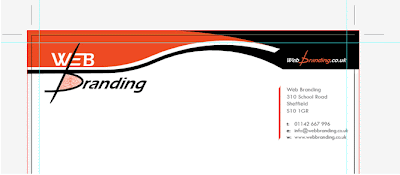
For this example I’m using an A4 sized letterhead for Web Branding,
I need to send it off to the printers with correct Registration Marks. This technique can also be used for designs for business cards or any other business stationery.
I need to send it off to the printers with correct Registration Marks. This technique can also be used for designs for business cards or any other business stationery.
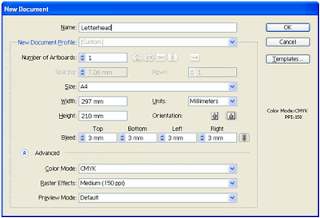
1) The size of an A4 sheet is 210mm x 297mm. Upon selecting New document add 3mm on the top, bottom, left and right of the document. This will create an excess border of 3mm to work from so when your letter head goes to the printers no white gaps are left near the edges.

2) Now for the margins.Turn on rulers, and then drag from the edge and drag guides to line up with the black edge of the artboard.
Ensure guides are un-locked.
Ensure guides are un-locked.
Click on each guide one at a time and press enter. A move window will pop up, instruct each line to move inwards by 5mm. ie. Top line moves vertical -5mm, the right guide moves -5mm horizontal..and so on until you’ve created 5mm spaced gap inside your artboard.
This will be our safe printing area, so ensure logos and text is within this area for a smart final print
3)Now draw a rectangle around your artboard. This will be the size of our A4 sheet, 210mm x 297mm. No-Fill just a thin border.
4) Select the rectangle, now to the menu > Effect > Crop Marks. Four new lines should appear at the corner of the page. If not make sure the A4 sized rectangle is definitely selected and try Crop Marks again.

5) We’re now ready to turn this into a Pdf ready to send to the printers. File > Save As, and select pdf and name accordingly.
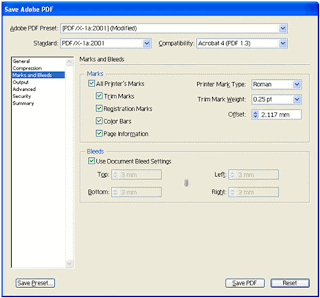
6) Upon clicking Save, the Save Adobe Pdf option screen will appear. On the drop down Adobe preset select [PDF /X-1a:2001] this is a common standard most printers are happy to work with.
7) Click on ‘Marks and Bleeds’ down the left of the window and click box the ‘All Printer’s Marks’..just below this also click the ‘Use Document Bleed Settings’ This will use the 3mm bleed gap we set up on making the new document.

8) Now Save PDF and click OK
9) Now to find our saved PDF and open it.
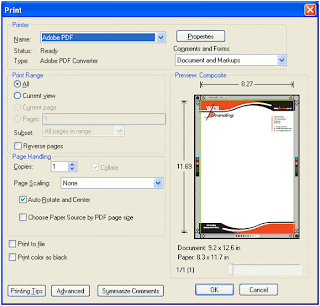
10) The PDF will now show Printing Registration marks around the edge. These will not print out, test this by selecting print in Adobe Acrobat. The marks around the edge are faded and won’t print. This PDF is now ready to send to the printers or a professional document to send to your clients.

I hope this blog helps..
By Web Branding


3 comments:
Nice useful post. thanks for this valuable information. you looks a perfect web designer.Ink cartridges
Great post for PDF printers. thanks for sharing it with me.
This will create an excess border of 3mm to work from so when your letter head goes to the printers no white gaps are left near the edges. shlogodesign.com/logo-design-illustrator-cs6/
Post a Comment